Docker Newbie
21 Apr 2018 • Leave Comments- Architecture
- Image Container and Registry
- Installation
- Start daemon
- Docker Context
- CLI Sample
- Pull Image
- Launch Containers
- Runtime metrics
- Data Share
- Nginx Container Sample
- Networking Drivers
- exec and shell
- Custom Image
- Share Images
- Docker Compose
- Troubleshooting
Architecture
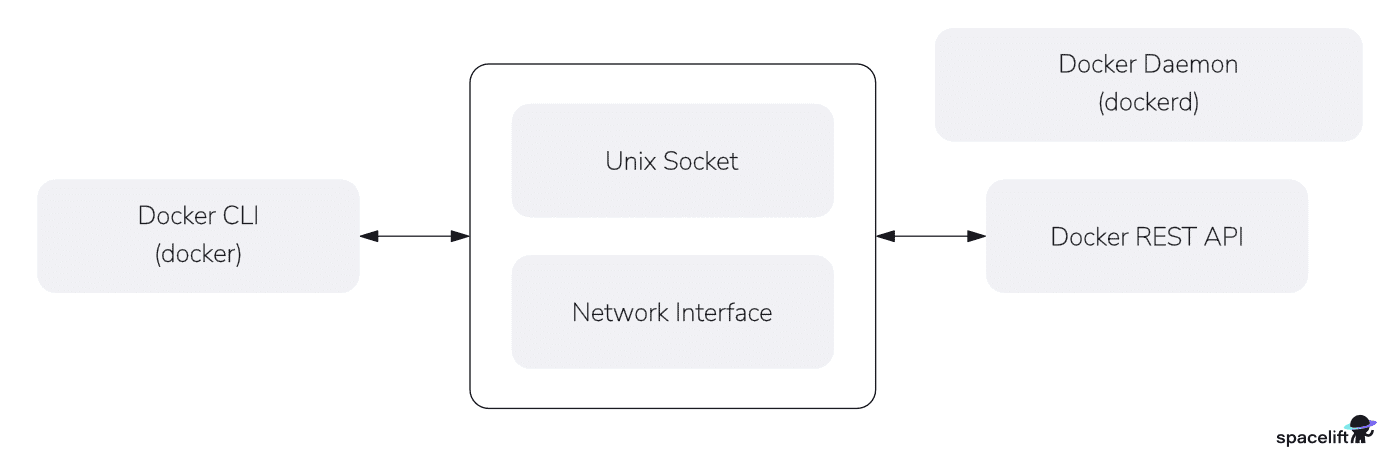
In general, Docker works in client-server mode illustrated in the figure below.
-
Server-side Docker Engine, also called Docker Daemon, is the dockerd that manages the containers, images, volumes, networks, etc.
The daemon serves requests by RESTful API over local Unix socket or over remote network interface.
-
Client-sdie Docker CLI are docker, docker-compose, etc.
CLI options and arguments are consolidated and transformed to REST API. We can use cURL to manage Docker objects.
The term "Docker" most of the time means the overall architecture.
Docker Engine
Most of the time, Docker Daemon is merely the daemon part. But occasionally, it may refer to the collection of Docker daemon, the Docker REST API and the Docker client. In this section, we focus on the daemon.
Docker Engine relies on Linux kernel under the hood, like the namespace (containers isolation), cgroup (resources management), libraries, etc. So, by "container", we actually mean "Linux container". But for convenience, we just call it "container".
At the very beginning, Docker Engine is an integrated piece of daemon including all capabilities to manage containers, images, volumes, networks, etc.
+--------------+            +-----------------+        +----------+
|              | REST API   |  Docker Engine  |        |+----------+
|  docker CLI  +----------->|                 +------->+|+----------+
|              |            |     dockerd     |         +|+----------+
+--------------+            +-----------------+          +|container+|
                                                          +----------+
Later on (2017), in order to expand its adoption and add neutrality and modularity, the core capabilities are donated to CNCF as a seperate daemon containerd (i.e. docker-containerd). The Docker Engine only focuses on developer experience like serving login, build, inspect, log, etc.
                                                       +--------------+
+--------------+            +-----------------+        |              |       +----------+
|              | REST API   |  Docker Engine  |  gRPC  | containerd   |       |+----------+
|  docker CLI  +----------->|                 +------->|     +------+ +------>+|+----------+
|              |            |     dockerd     |        |     | runc | |        +|+----------+
+--------------+            +-----------------+        |     +------+ |         +|container+|
                                                       +--------------+          +----------+
In the meantime, the Open Container Initiative (OCI) standardizes the containerd. According to the standard, the responsibility of creating containers was removed from containerd in faviour of runtime (e.g. runc). The interaction with Linux namespace and Linux cgroup has shifted from containerd to runtime. We call containerd the high-level runtime, managing container lifecycle, images, volumes, network, etc.
                                                       +--------------+
+--------------+            +-----------------+        |              |       +----------+
|              | REST API   |  Docker Engine  |  gRPC  | containerd   |       |+----------+
|  docker CLI  +----------->|                 +------->|     +------+ +------>+|+----------+
|              |            |     dockerd     |        |     | runc | |        +|+----------+
+--------------+            +-----------------+        |     +------+ |         +|container+|
                                                       +--------------+          +----------+
With OCI, everyone can build his own containerization system. Nowadays, there exist multiple OCI runtimes. In order to support those runtimes, Docker inserts a new component between containerd and runtime, namely the containerd-shim (e.g. docker-containerd-shim). The containerd-shim invokes the runtime (e.g. runc) to create the container. Once the container is created, the runtime exits and the lifecycle management is handed over to containerd and container-shim.
Some of the runtimes are fully compatibile with docker-containerd-shim like the youki, while others are not like the Wasmtime. Runtimes compatibile with docker-containerd-shim can be a drop-in replacement for runc. Runtimes incompatibile with docker-containerd-shim must implements their own shim according to shim API.
                                                                                                   container lifecycle
                                                                                   +--------------------------------------------+
                                                                                   |                                            v
                                                                                   |                   +---------------+   +---------+
                                                                                   |                   | runtime youki +-->|container|
                                                                                   |                   |    (exit)     |   +---------+
                                                                                   |                   +---------------+
                                                                                   v                      ^
+--------------+            +-----------------+        +--------------+    +-----------------+            |
|              |  REST API  |  Docker Engine  |  gRPC  |  High-level  |    |                 |   image    |                     .
|  docker CLI  +----------->|                 +------->|   runtime    +--->| containerd-shim +------------+                     .
|              |            |     dockerd     |        |  containerd  |    |                 |   bundle   |                     .
+--------------+            +-----------------+        +--------------+    +-----------------+            |
                                                                                   ^                      v
                                                                                   |                   +--------------+
                                                                                   |                   | runtime runc |    +---------+
                                                                                   |                   |    (exit)    +--->|container|
                                                                                   |                   +--------------+    +---------+
                                                                                   |                                            ^
                                                                                   +--------------------------------------------+
                                                                                                   container lifecycle
More and more middle layers are added to the architecture, making it too complicated. podman, on the other hand, is much more simpler as follows. podman talks directly to the runtime, without dockerd, conainerd or containerd-shim.
podman CLI -> runtime runc -> containers
We can actually create and run containers directly with runtime runc. It is out of the scope of this post, please read official runc page.
You are strongly recommended to read https://stackoverflow.com/q/46649592/2336707. The following output is a demonstration in my dev environment. Two containers were created and they are the child processes of the containerd-shim-runc-v2.
ubuntu@ip-172-31-9-194:~/misc$ docker run --name httpbin -P -d kennethreitz/httpbin
4bd1077052750a2a7552e4347bcbba483d47f2555b89874606c0b04b93f7c2dc

ubuntu@ip-172-31-9-194:~/misc$ docker run --rm -itd ubuntu
18be920d5a998ceee5f438ae43c7d1171fec6d34d4742c66611ff7a63f9d6a68

ubuntu@ip-172-31-9-194:~/misc$ docker ps
CONTAINER ID   IMAGE                  COMMAND                  CREATED          STATUS          PORTS                                       NAMES
a598c760b207   ubuntu                 "/bin/bash"              29 minutes ago   Up 29 minutes                                               ubuntu
4bd107705275   kennethreitz/httpbin   "gunicorn -b 0.0.0.0…"   48 minutes ago   Up 48 minutes   0.0.0.0:32768->80/tcp, [::]:32768->80/tcp   httpbin

ubuntu@ip-172-31-9-194:~/misc$ ps  -eF --forest
# dockerd
root         530       1  0 570701 82248  3 Dec23 ?        00:00:29 /usr/bin/dockerd -H fd:// --containerd=/run/containerd/containerd.sock
root       15033     530  0 436282 3968   0 Dec27 ?        00:00:00  \_ /usr/bin/docker-proxy -proto tcp -host-ip 0.0.0.0 -host-port 32768 -container-ip 172.17.0.2 -container-port 80
root       15040     530  0 399416 3840   0 Dec27 ?        00:00:00  \_ /usr/bin/docker-proxy -proto tcp -host-ip :: -host-port 32768 -container-ip 172.17.0.2 -container-port 80
# containerd
root         357       1  0 468968 48524  3 Dec23 ?        00:02:22 /usr/bin/containerd
# container httpbin
root       15063       1  0 309542 13748  0 Dec27 ?        00:00:04 /usr/bin/containerd-shim-runc-v2 -namespace moby -id 4bd1077052750a2a7552e4347bcbba483d47f2555b89874606c0b04b93f7c2dc -address /run/containerd/containerd.sock
root       15083   15063  0 21495 24480   0 Dec27 ?        00:00:05  \_ /usr/bin/python3 /usr/local/bin/gunicorn -b 0.0.0.0:80 httpbin:app -k gevent
root       15109   15083  0 32493 33912   3 Dec27 ?        00:00:08      \_ /usr/bin/python3 /usr/local/bin/gunicorn -b 0.0.0.0:80 httpbin:app -k gevent
# container ubuntu
root       15363       1  0 309542 13780  3 Dec27 ?        00:00:04 /usr/bin/containerd-shim-runc-v2 -namespace moby -id a598c760b2071f4951d35d255d3669ce3e9877534b36efcd21e2dfcb8727b136 -address /run/containerd/containerd.sock
root       15383   15363  0  1147  3840   2 Dec27 pts/0    00:00:00  \_ /bin/bash
Docker Desktop
In order to run containers on Window and macOS, a Linux virtual machine is required to host dockerd, containerd, containerd-shim, runtime, etc. The Docker CLI remains on the host.
As such, Docker provides the Docker Desktop. Docker Desktop is an all-in-one (including GUI) software and gives us a uniform expiernce accross Linux, Window and macOS.
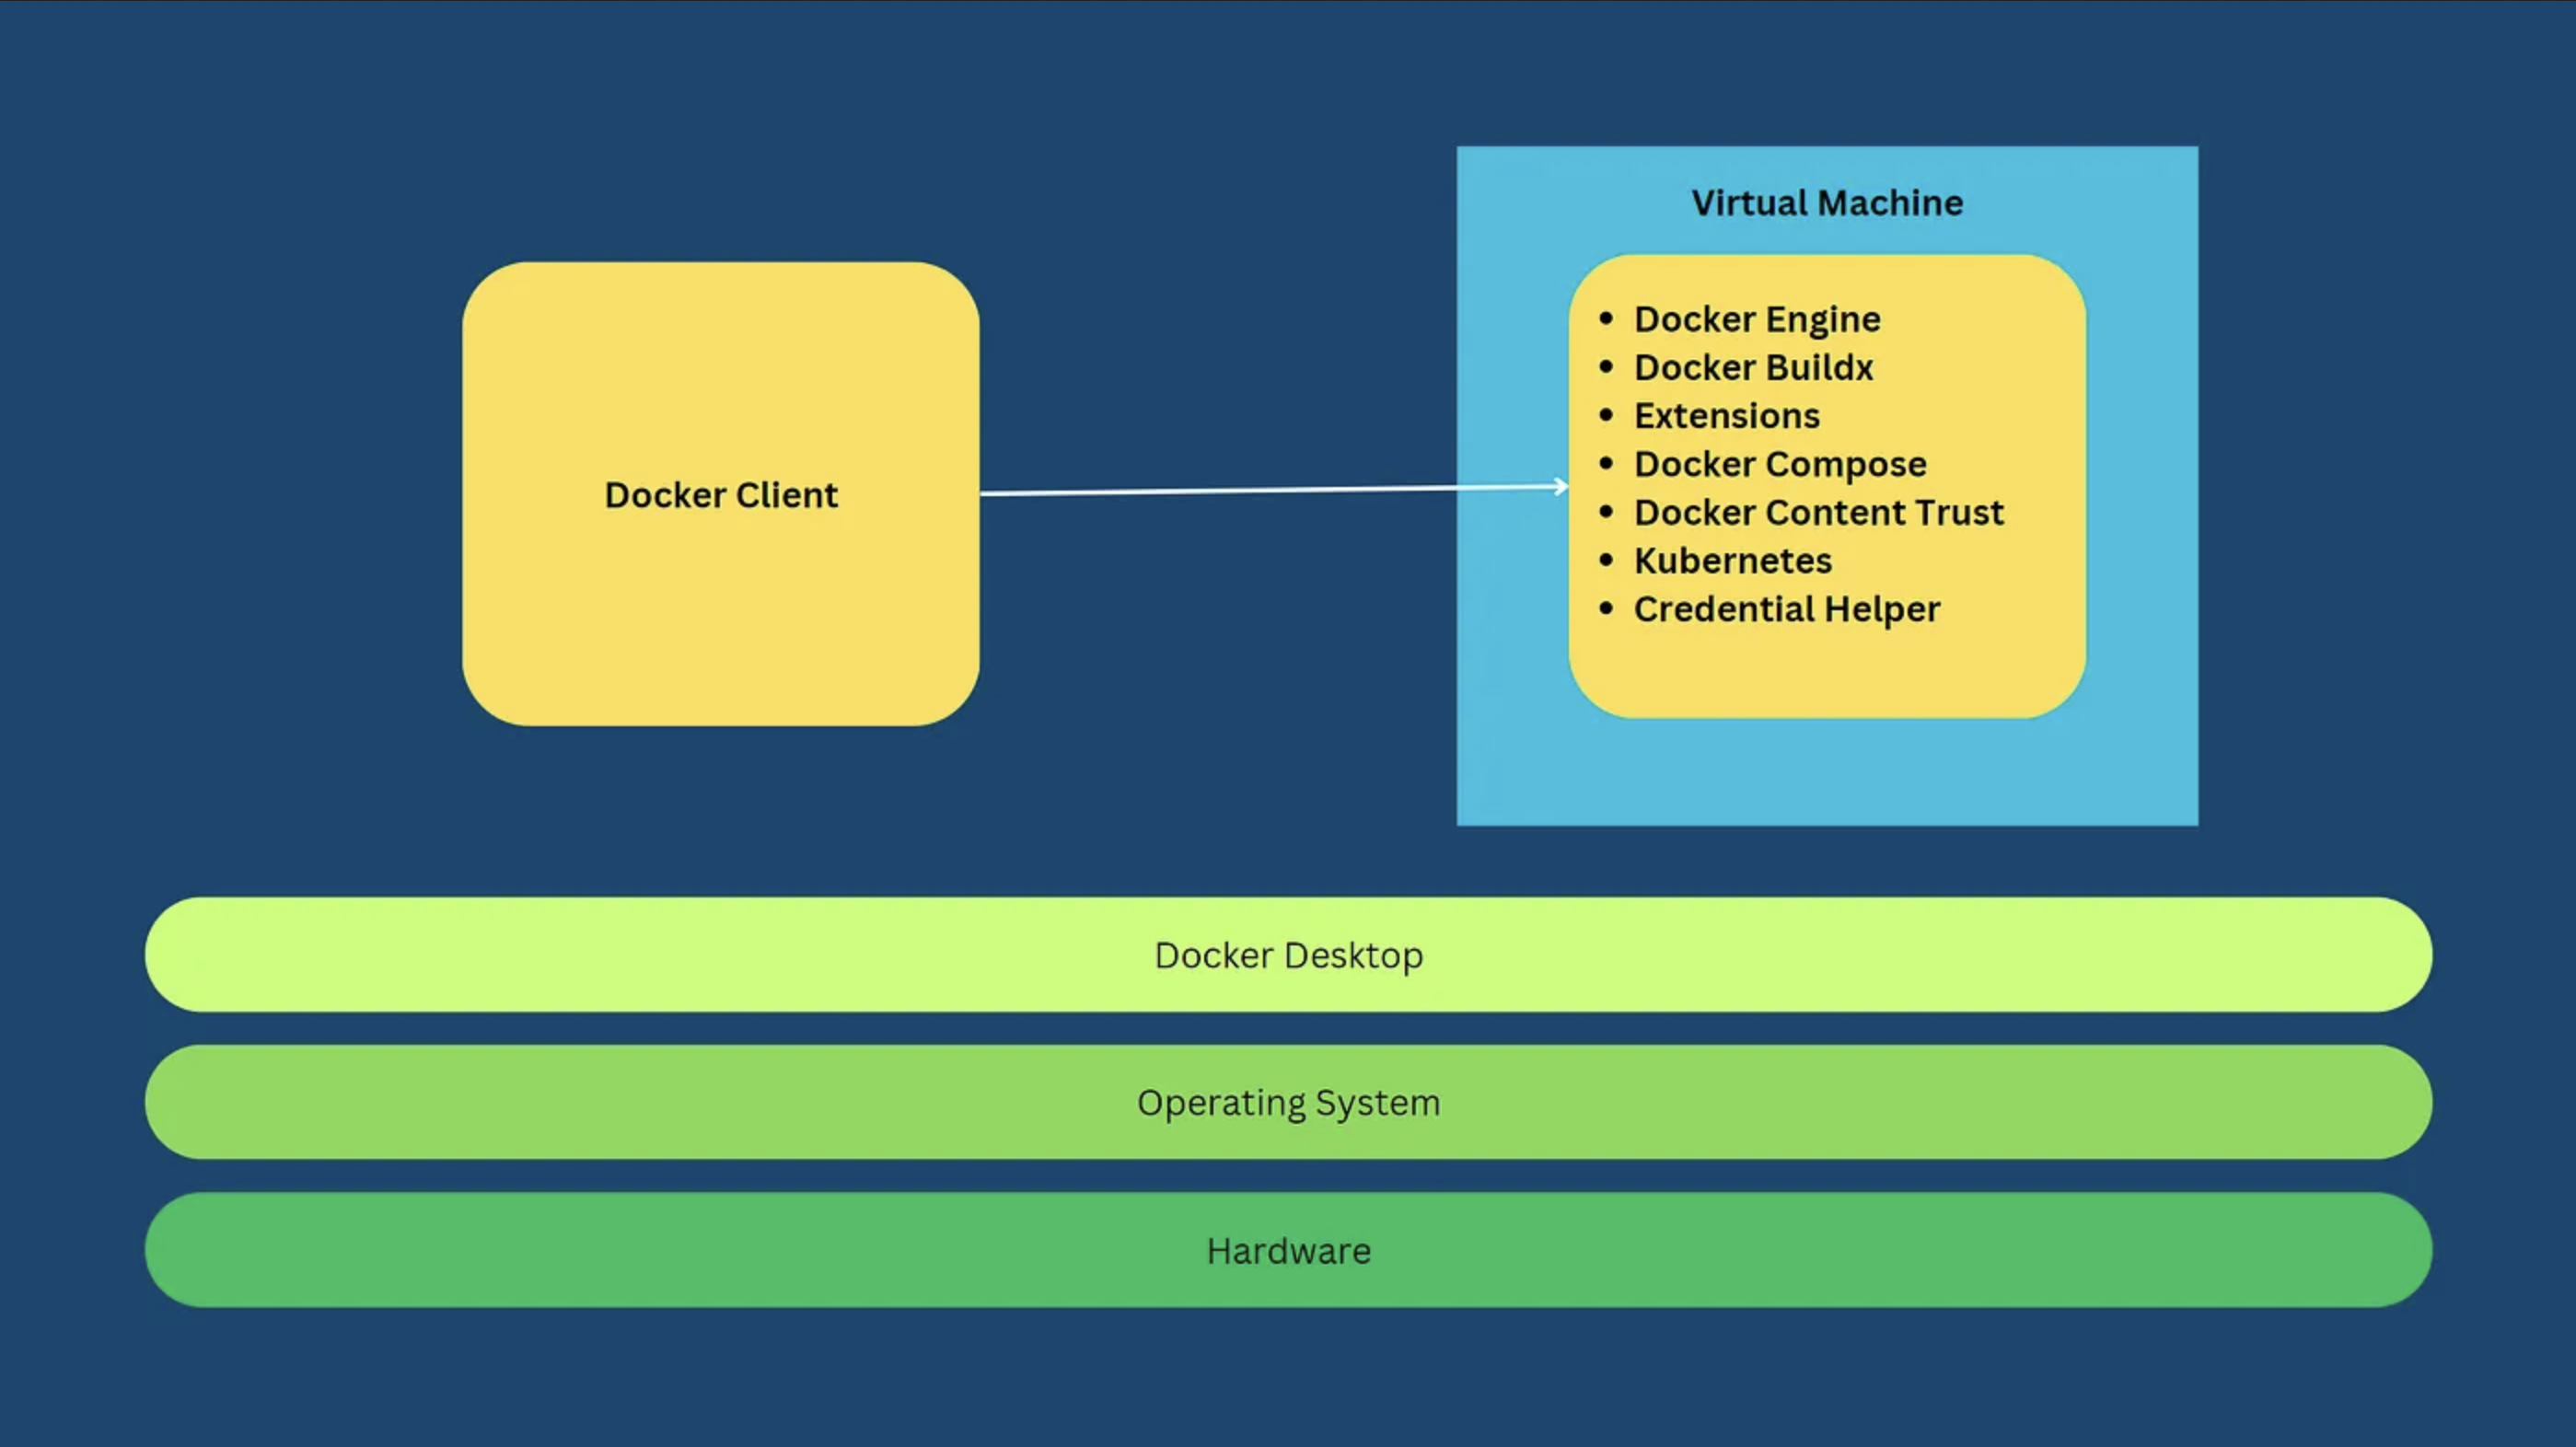
Especially, Docker Desktop creates the Linux virtual machine for us, so that we are not bothered on this. On Window and macOS, Docker Desktop utilizes native virtualization framework (Hyper-V and WSL 2 of Windows; Hypervisor of macOS) to boost performance. On Linux system, Docker Desktop is not a must. However, if we choose it, the Virtual Machine is still created.
Image Container and Registry
Dockers comprises image, container and registry.
-
Image is static, readonly and a minimal root filesystem bundle. There are many highly qualified base iamge from official registry like nginx, redis, php, python, ruby etc. Especially, we have ubuntu, centos, etc. that are just OS minimal bare bones (like Gentoo stage tarball).
An image consists of multiple incremental layers that are defined by a Dockerfile. Correspondingly, we call the image storage layer storage based on Union Filesytem (FS). Recall that booting USB stick also uses Union FS. The most adopted Union FS are overlay2.
-
Container is a set of processes with added isolation (Linux namespace) and resource management (Linux cgroup).
It is created on top of a base image with an additional layer storing running but volatile data. We can think of image and container as class and object in Object-oriented programming.
-
Registry is store where users publicize, share and download repostitory. The default registry is docker.io or registry-1.docker.io with a frontend website Docker Hub.
Repository, on the other hand, actually refers to name of an image (e.g. ubuntu). We can specify version of a repository by a tag (label) like ubuntu:16.04 (colon separator). The default tag is latest.
The naming of an image follows the format as follows.
registry.fqdn[:port]/[namespace/]repository[:tag | @<image-ID>]
- Default registry can be ommitted. Others like
quay.iomust be provided. - The namespace part means a registered account in the registry. It can be an individual user name or an organization name like "kong".
- repository is the default name of an image like "ubuntu" and "kong-gateway".
- tag is a string. Default to latest.
- image id comprises a SHA256 digest like @sha256:abea36737d98dea6109e1e292e0b9e443f59864b.
Specifying an image by tag can always gets the latest updates. For example, every time a patch release is released (e.g. kong/kong:3.4.5), kong/kong:3.4 refers to that patch version 3.4.5 with a different digest. On the other hand, an image specified by digest always is pinned to that specific image. See Pin actions to a full length commit SHA for security concerns.
Installation
We only install Docker CE version. For Windows and MacOS, Docker Desktop includes both Docker and Docker Compose. On Linux, it is highly recommended to install Docker and Docker Compose by official repo, or install by downloaded packages.
On Amazon Linux 2, we can install Docker by package manager, and then install Docker Compose by downloading binary file manually.
Install Docker by package manager:
~ $ sudo yum update -y

# CentOS
~ $ sudo yum install docker

# Amazon Linux 2 - https://docs.aws.amazon.com/AmazonECS/latest/developerguide/create-container-image.html
~ $ sudo amazon-linux-extras install docker

~ $ docker version
In order to run docker as a normal user, add the account to docker group:
~ $ sudo usermod -aG docker <username>

~ $ reboot
Install Docker Compose manually:
~ $ sudo mkdir -p /usr/local/lib/docker/cli-plugins
~ $ sudo curl -sSL https://github.com/docker/compose/releases/latest/download/docker-compose-$(uname -s)-$(uname -m) -o /usr/local/lib/docker/cli-plugins/docker-compose

~ $ sudo chmod +x /usr/local/lib/docker/cli-plugins/docker-compose
~ $ docker compose version

~ $ PATH="/usr/local/lib/docker/cli-plugins:$PATH"
~ $ docker-compose version
Start daemon
Start Docker Engine.
~ $ sudo systemctl enable docker
~ $ systemctl status docker
~ $ sudo systemctl start docker

~ $ docker info
~ $ docker ps
~ $ docker compose ls
All data is located in the /var/lib/docker directory.
ubuntu@ip-172-31-9-194:~/misc$ sudo -E PATH=$PATH ls /var/lib/docker/
buildkit  containers  engine-id  image  network  overlay2  plugins  runtimes  swarm  tmp  volumes
docker.sock
The daemon listens for RESTful API requests via either an Unix socket file at /var/run/docker.sock or an IP address. By default only the Unis socket file is enabled. See Docker Context for enabling the IP socket.
We can communicate with the daemon directly with cURL according to the Docker API spec.
~ $ curl --unix-socket /var/run/docker.sock --no-buffer http://localhost/events
~ $ curl --unix-socket /var/run/docker.sock http://localhost/version
~ $ curl --unix-socket /var/run/docker.sock http://localhost/images/json | jq
~ $ curl --unix-socket /var/run/docker.sock http://localhost/containers/json | jq
We can also create containers inside another container by mounting the socket file, as long as docker CLI is available.
# on host use the special 'docker' image
~ $ docker run --name docker-sock --rm -it -v /var/run/docker.sock:/var/run/docker.sock docker sh

# within docker-sock
/ # docker run --name docker-in-docker --rm -it ubuntu bash

# within docker-in-docker
root@978d8704d548:/#
On the host terminal, we can retrieve the nested containers
~ $ docker ps
CONTAINER ID   IMAGE     COMMAND                  CREATED          STATUS          PORTS           NAMES
978d8704d548   ubuntu    "bash"                   5 seconds ago    Up 4 seconds                    docker-in-docker
a3b93da63e90   docker    "dockerd-entrypoint.…"   17 seconds ago   Up 16 seconds   2375-2376/tcp   docker-sock
We can also get all containers from within docker-sock.
/ # docker ps -a
CONTAINER ID   IMAGE                    COMMAND                  CREATED         STATUS                       PORTS                NAMES
a3b93da63e90   docker                   "dockerd-entrypoint.…"   4 minutes ago   Up 4 minutes                 2375-2376/tcp        docker-sock
0dadcbdeb804   862614378b4c             "docker-entrypoint.s…"   13 months ago   Exited (0) 13 months ago                          eloquent_jones
f3f0faf83ac5   docker/getting-started   "/docker-entrypoint.…"   14 months ago   Exited (255) 13 months ago   0.0.0.0:80->80/tcp   romantic_colden
However, mounting docker.sock would make your host vulnerable to attack as Docker daemon within the container is ran as root.
Docker Context
Recall that Docker works in client-server mode, where the client connects to the server via RESTful API. As a developer, it is not unusual that we have different environment of different purposes such as development environment, staging environment, buildx environment, production environment, etc.
For a single docker CLI to communicate with different Docker Engines, we have Docker Context. A context is a profile recording the information of a Docker Engine like the IP address. To swtich between Docker Engines, just use docker context CLI.
By default, only the local Unix socket is enabled. The example below enables IP socket listening and but only binds to localhost for demo purpose. To expose the Docker Engine on public Internet, please follow the guide at security concern.
~ $ sudo systemctl editedit docker.service
# /etc/systemd/system/docker.service.d/override.conf
[Service]
ExecStart=
ExecStart=/usr/bin/dockerd -H fd:// -H tcp://127.0.0.1:2375 --containerd=/run/containerd/containerd.sock

~ $ sudo systemctl daemon-reload

~ $ sudo systemctl restart docker

~ $ ps -eFH | grep [d]ockerd
root       24927       1  0 552268 77412  3 07:29 ?        00:00:00   /usr/bin/dockerd -H fd:// -H tcp://127.0.0.1:2375 --containerd=/run/containerd/containerd.sock

~ $ curl -sS http://localhost:2375/containers/json | jq -r '.[].Names'
[
  "/httpbin"
]
CLI Sample
~ $ fgrep -qa docker /proc/1/cgroup; echo $?                    # check if it is within a docker or on the host

~ $ docker info                                                 # display the outline of docker environment
~ $ docker image/container ls [-a]                              # list images/containers
~ $ docker [image] history                                      # show layers of an image
~ $ docker inspect [ name | ID ]                                # display low-level details on any docker objects
~ $ docker logs <container>
Here is the full list of docker CLI: Docker CLI.
Pull Image
It is highly recommended to pull the docker/getting-started image, run and visit http://localhost.
~ $ docker search -f is-official=true ubuntu                    # search only official image

~ $ docker pull ubuntu:16.04                                    # specify a tag
~ $ docker pull ubuntu@sha256:<hash>                            # specify an image ID

~ $ docker images
-
docker search search docker images from registries defined in /etc/container/registries.conf.
Unfortunately, it does not suport tags or IDs. Instead, go to the registry website or check third party tool DevOps-Python-tools.
- We can offer docker pull a tag (i.e. 'ubuntu:latest') or an image ID.
-
When pulling an image without its digest, we can update the image with the same pull command again.
On the contrary, with digest, the image is fixed and pinned to that exact version. This makes sure you are interacting with the exact image. However, upcoming security fixes are also missed.
To get image digest, we either go to the official registry, use
images --digests, or even inspect command. - Any any time, Ctrl-C terminates the pull process.
- Docker support proxy configuration when feteching the images.
Launch Containers
docker run equals docker create plus docker start. Usually, we just docker run.
Syntax.
docker run [OPTIONS] IMAGE [COMMAND] [ARG...]
Example:
~ $ docker run --name centos-5.8 \
-d \
-it \
--rm \
--mount type=bind,src=/home/jim/workspace/,dst=/home/jim/workspace/,ro \
-w /home/jim/workspace/ \
--net host
-u $(id -u):$(id -g) \
7a126f3dba08 \
bash

#
root@docker ~ # cat /etc/os-release
root@docker ~ # exit 13
root@docker ~ # echo $?
- When we run an image, a container is created with an extra layer of writable filesystem.
-
To be compatible with AMD64/ARM64, we can add the
--platform linux/x86_64or--platform linux/arm64. Check multi-platform-docker-build.This also applies to docker build.
-
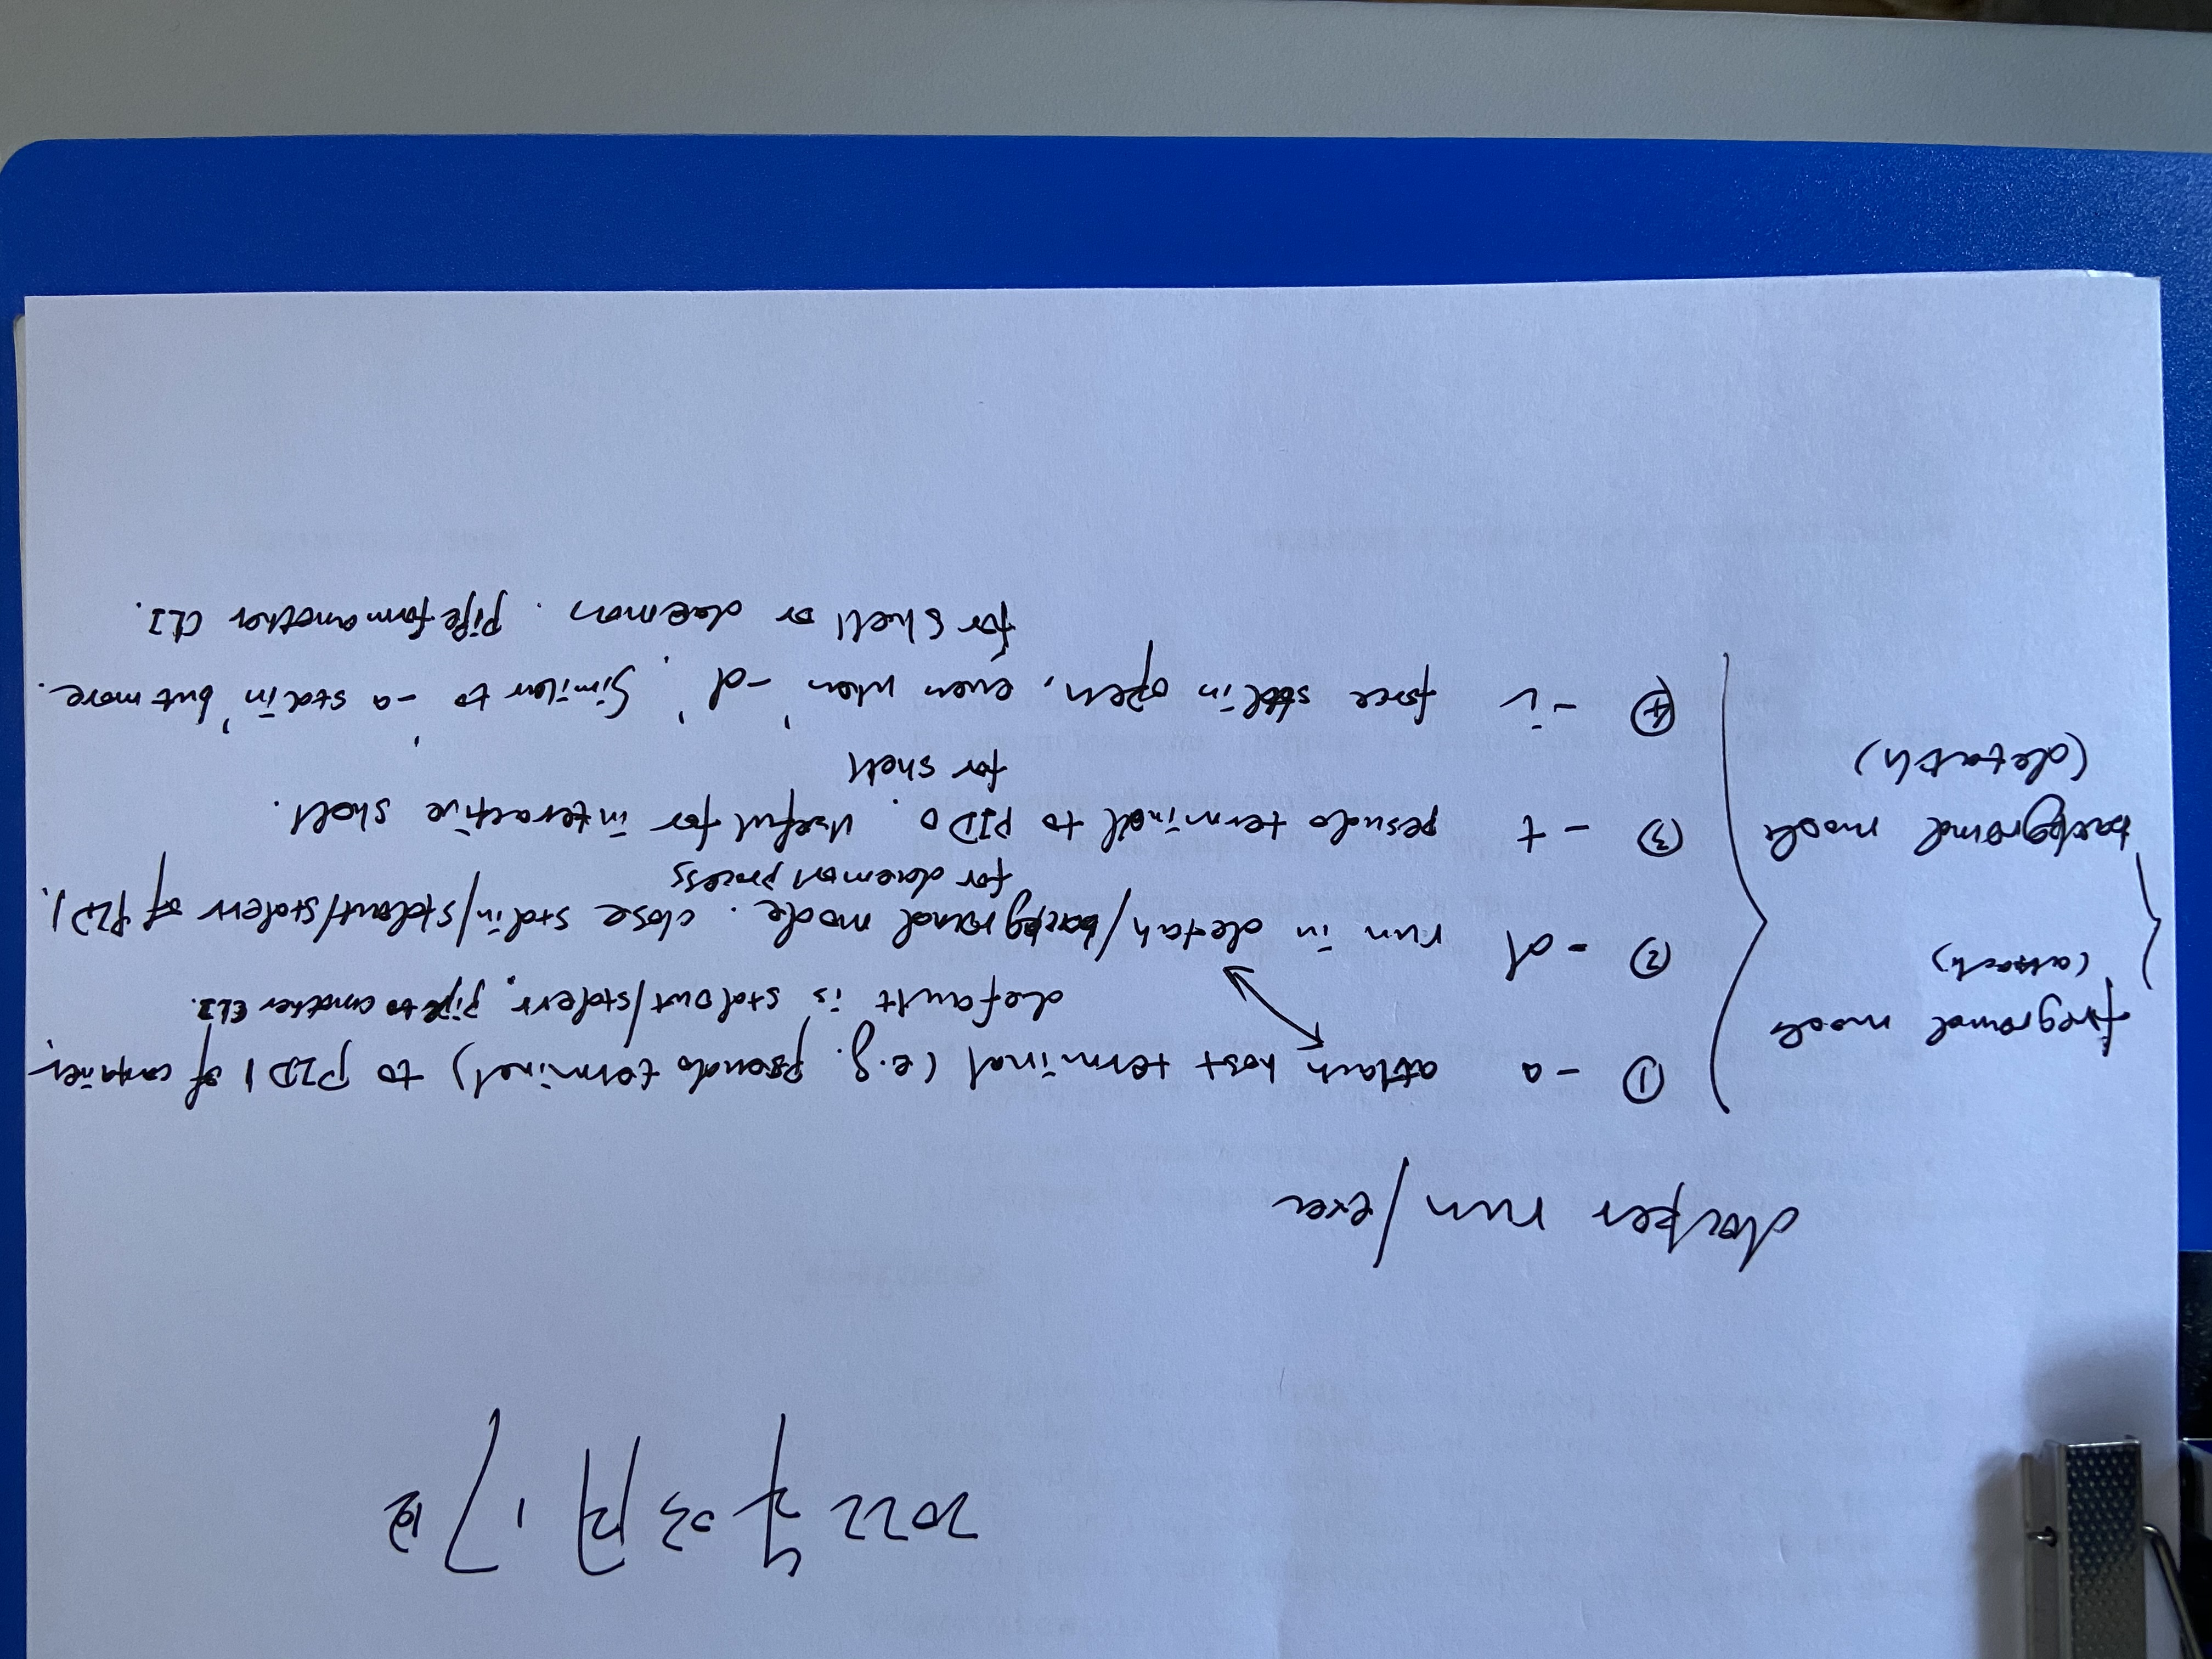
By default, the root process of a container (PID 1), namely the CMD/ENTRYPOINTWITH is started in the forground mode. The host terminal is attached to the process's STDOUT/STDERR, but not STDIN. So we can see the output (error message included) of the root process as follows:
~ $ docker run -t --rm ubuntu ls /
bin   dev  home  media  opt   root  sbin  sys  usr
boot  etc  lib   mnt    proc  run   srv   tmp  var

~ $ docker run --rm ubuntu ls /
bin
boot
dev
etc
home
lib
media
mnt
opt
proc
root
run
sbin
srv
sys
tmp
usr
var
We can use multiple
-aoptions to control the attachment combinations of STDIN/STDOUT/STDERR. To following example, we can even input to the root process as long as its STDIN is open. Refer to confused-about-docker-t-option-to-allocate-a-pseudo-tty and Attach to STDIN/STDOUT/STDERR.~ $ docker run -a stdin -a stdout ...If we want to start the process in background mode, namely the detach mode, then add the
-doption. Containers runs in this mode will print the container ID and release host terminal immediately. So we cannot input to the root process or see the output or error message: STDIN/STDOUT/STDERR detached. If the root process exits, then the container exits as well. So we cannot do like this:~ $ docker run -d -p 80:80 my_image service nginx startAs the root process service exits immediately after nginx is started. The next example will keep the container running as the tail command persists:
~ $ docker run -d ubuntu bash -c "tail -f /dev/null" -
-tallocates a pseudo-TTY connected for the root process, especially useful when the process is an interactive Shell. The-ioption forces the process's STDIN to be open and runs the container interactively, so we can input some data to the process directly, which works even when-dis present. Here is an example:echo test | docker run -i ubuntu cat - testThe two options are usually used together for Shell:
-tcreates a pseudo-TTY, while-imakes the STDIN of the pseudo-TTY open for data input.# STDIN not open by default, so keeps waiting for input ~ $ dockder run -t --rm ubuntu bash # can input/output, but no standalone STDOUT, reuse that of host terminal ~ $ docker run -i --rum ubunty bash # standalone stdin/stdout/stderr, also interactive for input ~ $ docker run -it --rum ubunty bash --rmautomatically remove the container when it exits.- Check Data Share for
--mount. -wlets the root process running inside the given directory that is created on demand.--net, --networkconnects the container to a network. By default, it is bridge. Details are discussed in later sections.-u, --userruns the root process as a non-root user. Attention that, the username is that within the container. So the image creator should create that name in Dockerfile.- bash overrides the CMD/ENTRYPOINT instructions of the image.
Here is a note about the different options:
Please also follow this post Cannot pipe to docker run with stdin attached.
Runtime metrics
Please see https://docs.docker.com/engine/containers/runmetrics/.
Data Share
Docker containers can read from or write to pathnames, either on host or on memory filesystem - to share data. There are three storage types:
-
Volume, Data Volume, or Named Volume.
By default, running data of a container is layered on top of the image used to create it. A volume decouples that data from both the host or the container. Just think of a Windows partition or removable disk drive.
Volumes are managed by Docker and persist. Data within can be shared among multiple containers, as well as between the host and a container.
Beofre you restart a docker compose project, please run "docker volume prune -a", otherwise history data might interrupt new containers.
-
Bind Mount.
Bind-mount a file or directory in the host to a file or directory in the container. The target can be read-only or read-write. For example, bind host /etc/resolv.conf to a container, sharing name servers.
Attention please; to bind-mount a file, please provide the absolute path, otherwise the dest pathname in the container might be a directory! Check How to mount a single file in a volume.
-
tmpfsMount.Needless to say, tmpfs is a memory filesystem that let container stores data in host memory.
We use option --volume , -v and --mount to share data between containers and hosts. --mount is recommended as it support all 3 kinds of data sharing and is more verbose. --volume will be deprecated soon.
If the file or directory on the host does not exist. --volume and --mount behaves differently. --volume would create the pathname as a directory, NOT a file, while --mount would report error.
On the other hand, if the target pathname already exists in the container, both options would obsecure contents over there. This is useful if we'd like to test a new version of code without touching the original copies.
ENV Variables
To pass environment variables to containers, we can:
-e, --envapplies only todocker run. This method reveal sensitive values in Shell history. We can firstly export the variable on CLI, then pass--env VARwithout the value part.- –env-file (default
$PWD/.env) applies both todocker runand docker compose. This fits when there are a lot of variables to pass in. - docker compose can pick up a few compose-specific variables from CLI, so just export it.
- CLI variables can also be for substitution in compose file.
SELinux
When bind-mount a file or mount a directory of host, SELinx policy in the container may restrict access to the shared pathname.
-
Temporarily turn off SELinux policy:
~ $ su -c "setenforce 0" ~ $ docker restart container-ID -
Adding a SELinux rule for the shared pathname:
~ $ chcon -Rt svirt_sandbox_file_t /path/to/ -
Pass argument
:zor:Zto--volumeoption:-v /root/workspace:/root/workspace:zAttention please,
--mountdoes not support this. -
Pass
--privileged=trueto docker run.However, this method is discouraged as privileged containers bring in security risks. If it is the last resort, first create a privileged container and then create a non-priviledged container inside.
Privilege permissions can have fine-grained control by
--cap-addor--cap-drop, which is recommended!
Nginx Container Sample
~ $ docker run --name webserver \
-d \
--net host
--mount type=bind,source=/tmp/logs,target=/var/log/nginx \
-p 8080:80 nginx

~ $ docker container ls
~ $ docker container logs webserver
~ $ docker container stop/kill webserver
~ $ docker container start webserver
~ $ docker container rm webserve          # remove one or more container (even running instances)
~ $ docker container prune                # remove all stopped container
-pmaps host port 8080 to container port 80 that is already bound to host Nginx process.-
Check the Dockerfile, there is a line telling how Nginx should be started:
CMD ["nginx", "-g", "daemon off;"] - The
--mounttype is a Bind Mount directory. - Visit the Nginx container page at http://host-ip:8080.
- stop attempts to trigger a graceful shutdown by sending the standard POSIX signal SIGTERM, whereas kill just kills the process by sending SIGKILL signal.
Get into Container
Exec a simple command in container:
~ $ docker exec webserver sh -c 'echo $PATH'
~ $ docker exec webserver ps
Sometimes, we want to exec the command in the background when we do not care about its output or need not any input:
~ $ docker exec -d webserver touch /tmp/test.txt
If we want to interactively and continuously control the container:
~ $ docker exec -it webserver bash
Apart from docker exec, docker attach <container> is also recommended.
This command attaches the host terminal's STDIN, STDOUT and STDERR files to a running container, allowing interactive control or inspect as if the container was running directly in the host's terminal. It will display the output of the ENTRYPOINT/CMD process.
For example, a container can be shutdown by C-c shortcut, sending the SIGINT signal (identical to SIGTERM) to the container by default. Rather, C-p C-q detaches from the container and leave it running in the background again.
If the process is running as PID 1 (like /usr/bin/init), it ignores any signal and will not terminate on SIGINT or SIGTERM unless it is coded to do so.
Networking Drivers
The Docker's networking subsystem is pluggable, using drivers. Docker provides multiple built-in networks, based on which we can define custom networks.
Below is a simple explanation:
-
Bridge
The default driver if none is given upon run, providing network isolation from the outside. It is to bridge traffic among multiple containers and the host. Check the image below, docker0 is the bridge interface.
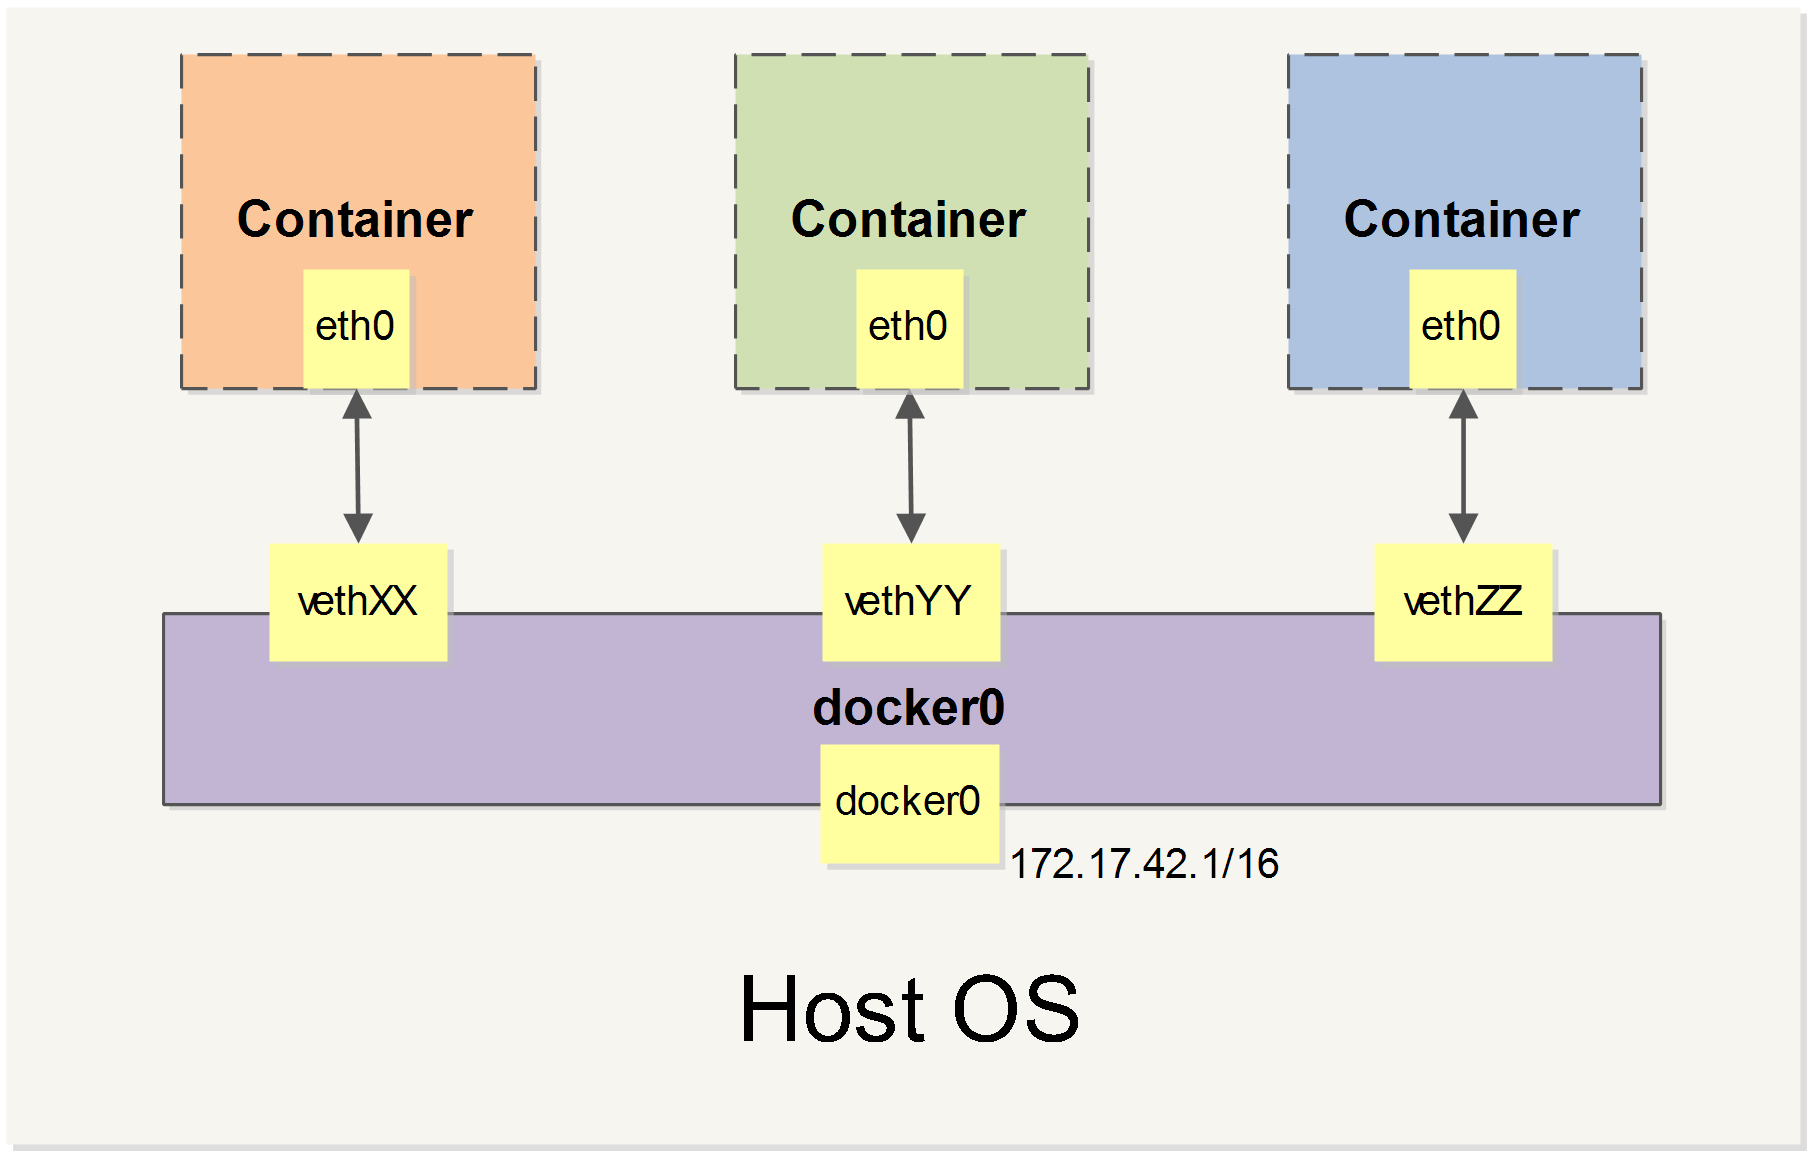
If we define a custom bridge network, containers within can communicate with each other by alias or name, otherwise they can only communicate by IP addresses.
Pay attention please; this is different from the bridge mode of VMWare or VirtualBox (real Virtual Machine). VMWare and VirtualBox's bridge is deployed directly on the host's interface and appears to be a real physical device parallel to the host and can be connected to from within LAN directly.
-
Share the host's networking directly without isolation. However, LAN devices cannot differntiate between containers and the host as there is not individual IP addressed assigned to containers. The host mode is preferred when the service exposes a port publicly like Nginx servers.
To use host network, just add
network_mode: hostto Dockder compose file, and but must remove the ports mappings as containers share the same network as the host. Alternatively, add--network=hostoption todocker run.Unfortunately, host mode does not work on macOS.
-
Overlay
Overlay connects multiple Docker daemons together, creating a distributed network among multiple Docker daemon hosts. This network sits on top of (overlays) the host-specific networks, allowing containers connected to it.
-
macvlan
As the name implied, maclan assignes a MAC address to a container, making it be a physical device on the same network as the host - counterpart of VMWare/VirtualBox's 'bridge'.
-
none
Disable networking.
DNS
Docker Destkop has multiple built-in DNS servers as follows.
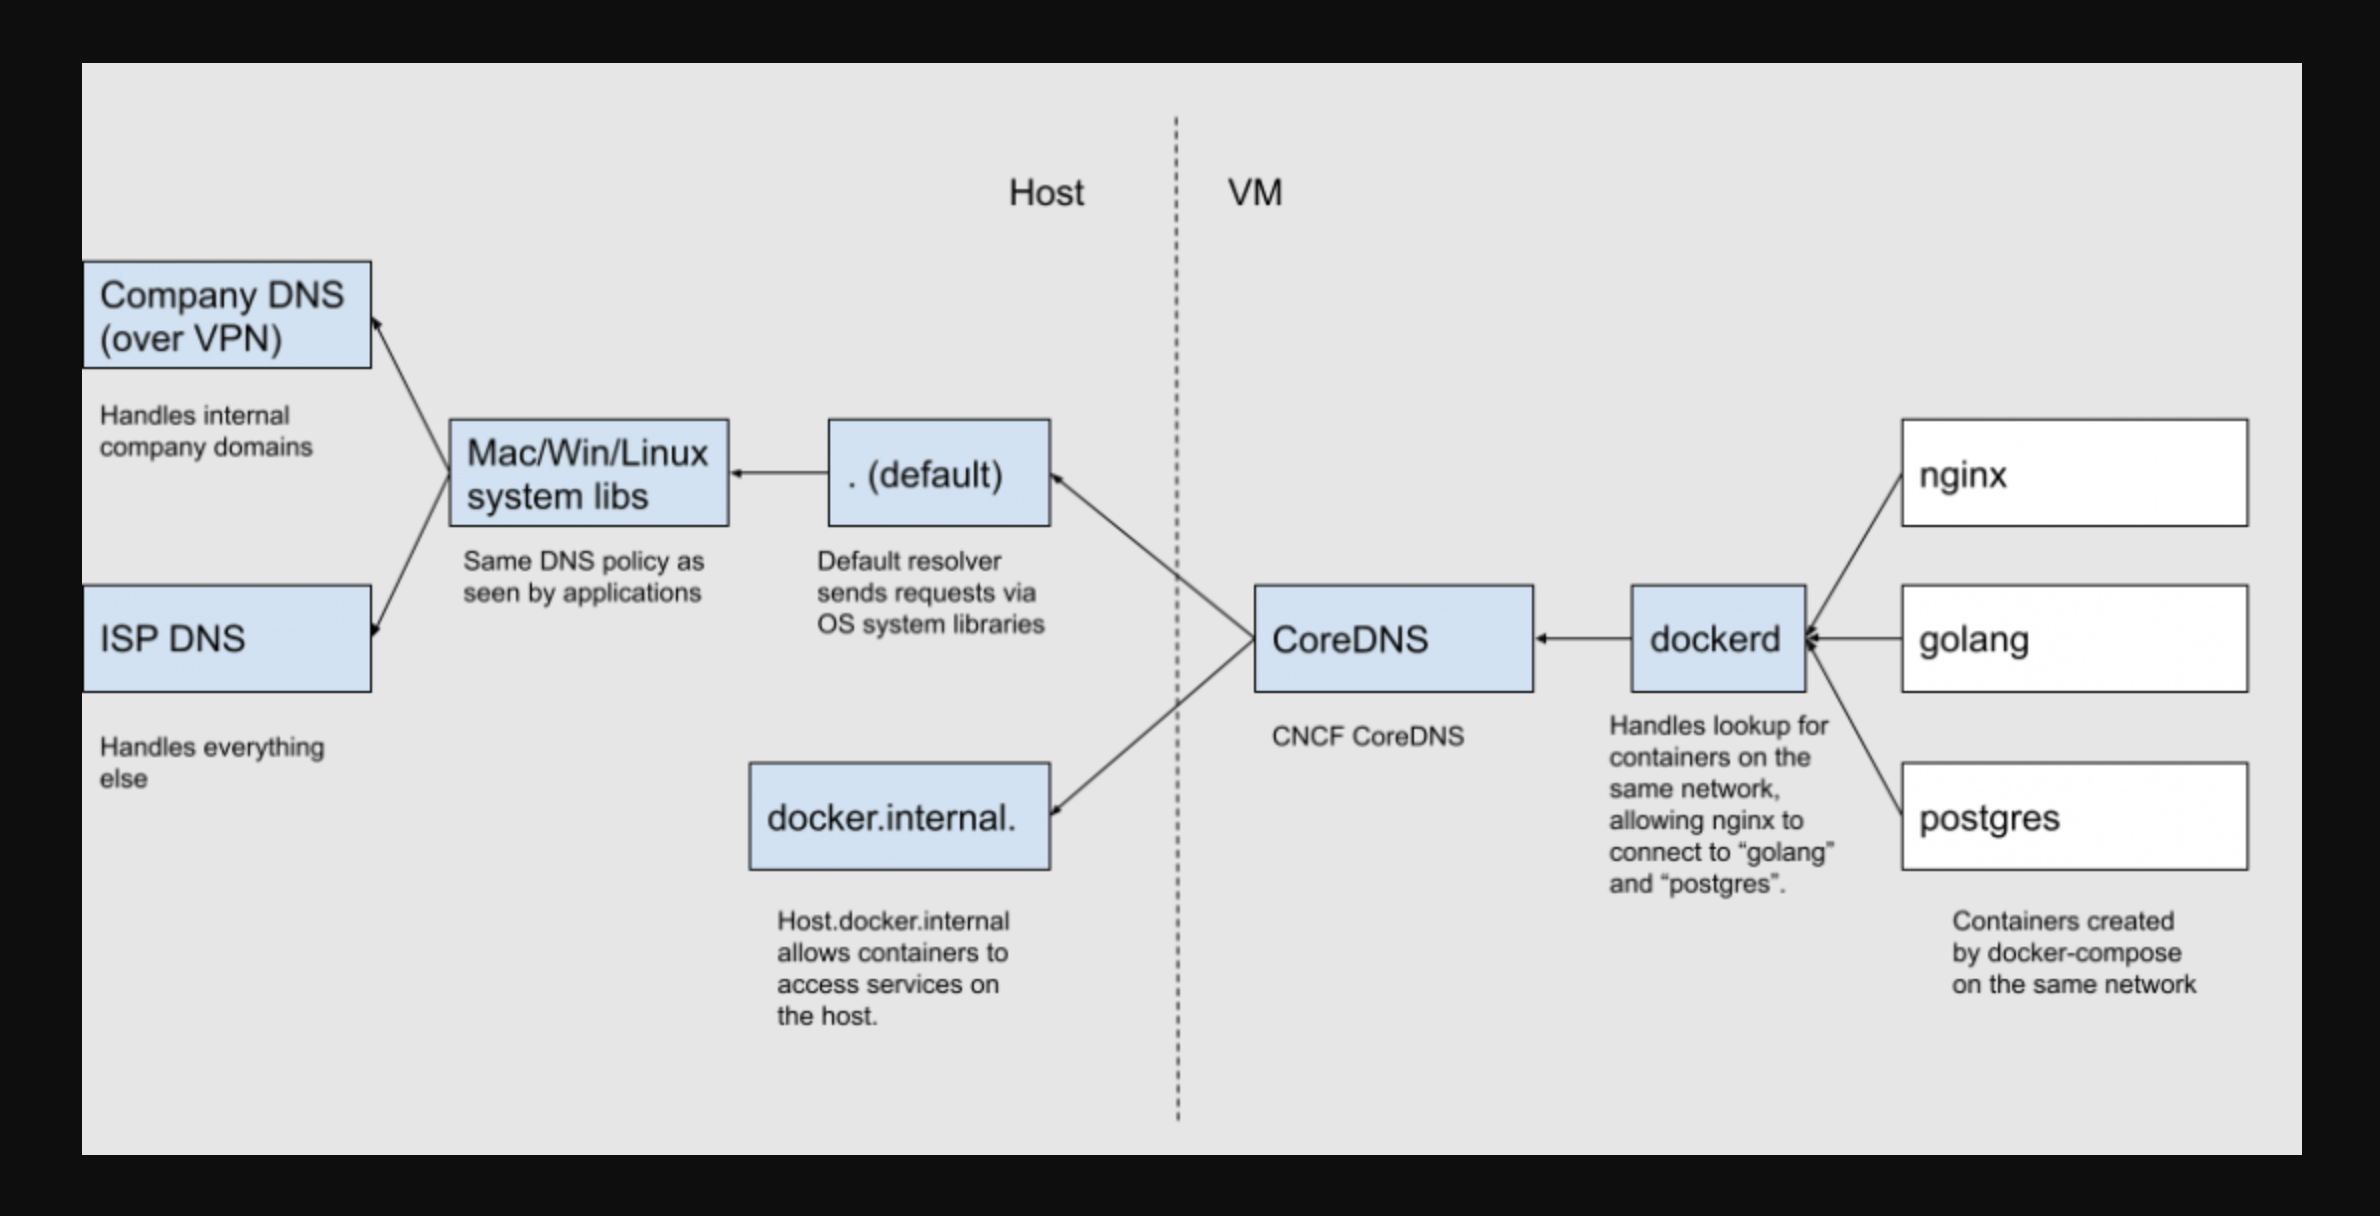
When resolving containers within the the same Docker network, the internal DNS within dockerd is utilized. However, resolving hostnames outside of the Docker network, would be forwarded to host via CoreDNS.
Please read How Docker Desktop Networking Works Under the Hood regarding how Docker Destop achieves DNS, HTTP Proxy, TCP/IP stack, Port Forwarding, etc. network features via vpnkit.
host.docker.internal
Occasionally, we want to access to host services from within containers.
- If the container is booted with host network, then use
localhostor127.0.0.1. - If the container is booted with bridge network, then use
host.docker.internal. Depending on the platform, we might need a bit setup.- On macOS,
host.docker.internalis intuitively supported. - On Linux, we should manually add
host.docker.internal:host-gatewaytodocker run --add-hostor to extra_hosts of docker compose. This would add an entry in "/etc/hosts".
- On macOS,
The hostname "host.docker.internal" is used only for connection, so please set the correct "Host" header. See example below.
~$ docker exec -it alpine sh

/ # curl -v http://localhost/anything --connect-to localhost:80:host.docker.internal:80
* processing: http://localhost/anything
* Connecting to hostname: host.docker.internal
* Connecting to port: 80
*   Trying 192.168.65.254:80...
* Connected to host.docker.internal (192.168.65.254) port 80
> GET /anything HTTP/1.1
> Host: localhost
> User-Agent: curl/8.2.1
> Accept: */*
>
< HTTP/1.1 200 OK
< Server: openresty/1.21.4.2rc1
< Date: Sat, 05 Aug 2023 06:45:34 GMT
< Content-Type: application/json
< Transfer-Encoding: chunked
< Connection: close
<
{"message":"hello, world"}
* Closing connection
Self-define Network
Docker automates network configuration upon container startup. We can customize that on purpose.
~ $ docker network ls
~ $ docker network create -d bridge mynet
~ $ docker run -it --name ubt1604 -v /src/hostdir:/opt/condir:rw --network mynet ubuntu:16.04
~ $ docker network inspect mynet
Use the --net or --network option. To the 'host' networking driver, just pass --net host option to docker run.
SSH Agent Forwarding
In order not to set up a new SSH environment within containers, we can forward SSH agent on host to container.
For Docker Desktop:
~ $ docker run --rm -it -u root \
--mount "type=bind,src=/run/host-services/ssh-auth.sock,target=/run/host-services/ssh-auth.sock,ro" \
-e SSH_AUTH_SOCK="/run/host-services/ssh-auth.sock" \
--entrypoint /bin/bash kong/kong-gateway:latest

root@3442a4bc63cd:/# ssh-add -l
For Docker engine:
~ $ docker run --rm -it -u root \
--mount "type=bind,src=$SSH_AUTH_SOCK,target=/run/host-services/ssh-auth.sock,ro" \
-e SSH_AUTH_SOCK="/run/host-services/ssh-auth.sock" \
--entrypoint /bin/bash kong/kong-gateway:latest

root@3442a4bc63cd:/# ssh-add -l
It may report permission issue. We should add the w (write) permission to the socket file. Do it on the host and/or within the container. The example below shows the socket file disallows w by "others" that the "kong" account belongs to. See macOS SSH agent forwarding not working any longer.
# in the container
kong@66cbbf96f403:/$ ssh-add -l
Error connecting to agent: Permission denied

kong@66cbbf96f403:/$ ls -l $SSH_AUTH_SOCK
srwxrwxr-x 1 501 ubuntu 0 Jan  2 13:11 /run/host-services/ssh-auth.sock

~ $ sudo chmod o+w /run/host-services/ssh-auth.sock
Attention that, if you are SSH into Linux VPS from macOS, the SSH agent might be forwarded to the Linux VPS, depending on the SSH config on macOS. This is totally a different topic. Containers in the Linux VPS has no access to the forwarded macOS SSH agent, and we should launch a new one in the Linux VPS.
link
The legacy communication method is --link. Docker copies information (e.g. ENV Variables) from source container to receipt (target) container, and provides network access from receipt container to source container.
Take docker run --name web --link postgres:alias ... for example, the newly created web is receipt container and the existing postgres is source container.
--link is amost deprecated as we can use other features to accomplish the same functionalities. For example, for info copy, use ENV Variables or data share. For network communication, just follow Networking Drivers and Self-define Network.
Here is an example:
## source container

13:47:23 zachary@Zacharys-MacBook-Pro ~$ docker run --name postgres -e HELLO=world -e POSTGRES_HOST_AUTH_METHOD=trust -d postgres:14
25732d58f238b1d3e83fc52ea3c8b91f75290385066e6541d616e68eecd6cfdd

13:47:39 zachary@Zacharys-MacBook-Pro ~$ docker exec -it postgres bash
root@25732d58f238:/# echo $HELLO
world


## receipt/target container

13:48:11 zachary@Zacharys-MacBook-Pro ~$ docker run --name ubuntu -it --link postgres:db ubuntu bash

# src in hosts
root@8e95191dba0e:/# cat /etc/hosts
127.0.0.1       localhost
::1     localhost ip6-localhost ip6-loopback
fe00::0 ip6-localnet
ff00::0 ip6-mcastprefix
ff02::1 ip6-allnodes
ff02::2 ip6-allrouters
172.17.0.3      db 25732d58f238 postgres
172.17.0.4      8e95191dba0e

# src ENVs
root@8e95191dba0e:/# env | grep DB_ | sort
DB_ENV_GOSU_VERSION=1.14
DB_ENV_HELLO=world
DB_ENV_LANG=en_US.utf8
DB_ENV_PGDATA=/var/lib/postgresql/data
DB_ENV_PG_MAJOR=14
DB_ENV_PG_VERSION=14.4-1.pgdg110+1
DB_ENV_POSTGRES_HOST_AUTH_METHOD=trust
DB_NAME=/ubuntu/db
DB_PORT=tcp://172.17.0.3:5432
DB_PORT_5432_TCP=tcp://172.17.0.3:5432
DB_PORT_5432_TCP_ADDR=172.17.0.3
DB_PORT_5432_TCP_PORT=5432
DB_PORT_5432_TCP_PROTO=tcp

# src network
root@8e95191dba0e:/# ping db
PING db (172.17.0.3) 56(84) bytes of data.
64 bytes from db (172.17.0.3): icmp_seq=1 ttl=64 time=0.210 ms
64 bytes from db (172.17.0.3): icmp_seq=2 ttl=64 time=0.452 ms
64 bytes from db (172.17.0.3): icmp_seq=3 ttl=64 time=0.136 ms
Attention please; --link is one-way link only. Info is transferred from source containers to receipt containers but source containers know nothing about receipt containers. To achieve bi-directional communication, please use network.
exec and shell
Usually, in the end of image, we have three kinds of instruction:
- RUN. Creates a new layer of image. Usually used to install package. It's recommended to install multiple packages in a single RUN instruction so that we have less image layers.
- CMD. Set the default command to run when run a container.
- ENTRYPOINT. run a container as a command, so that we can provide extra arguments when run.
Refer to RUN, ENTRYPOINT and CMD for more details.
Each instruction has two kinds of running forms:
-
shell form.
<instruction> cmd arg1 arg2 ...By default, /bin/sh will be used to run the cmd as:
/bin/sh -c 'cmd arg1 arg2 ...'It is the preferred form of the RUN instruction to install package in the image and exit.
-
exec form.
The cmd is ran directly without any Shell involvement, which is the preferred form of CMD and ENTRYPOINT as we usually launch a daemon background within the container. No need to maintain a Shell process.
<instruction> ["cmd", "arg1", "arg2", ...]
If we want to run the cmd with Bash, we can use the exec form but explicitly invoke /bin/bash.
<instruction> ["/bin/bash", "-c", "cmd", "arg1", "arg2", ...]
Refer to exec form or sh form for more details.
When there are multiple CMD or ENTRYPOINT instructions inherited from different image layers, only that of the topmost layer is respected! We can use docker container inspect to show the instructions and their forms. For example, nginx image has CMD ["nginx", "-g", "daemon off;"].
We can pass custom commands and arguments when invoking docker run, which will override the CMD instruction and arguments thereof. If there exists the ENTRYPOINT instruction in exec form, then custom arguments would be appended to the ENTRYPOINT cmd. By default, ENTRYPOINT exec form will take extra arguments from CMD instruction in shell form. Custom arguments when docker run will override those in the CMD instruction. ENTRYPOINT in shell form would ignore custom arguments from CMD or docker run.
We can override ENTRYPOINT and/or CMD as follows.
# docker run --entrypoint /path/to/cmd <image> -a arg1 -b arg2 arg3

~ $ docker run --entrypoint /bin/bash -it nginx

~ $ docker run --rm --entrypoint /bin/bash kong/kong-gateway:latest -c "kong version"
Kong Enterprise 3.6.1.0

# docker run --entrypoint '' <image> /path/to/cmd -a arg1 -b arg2 arg3

~ $ docker run --rm --entrypoint '' -it kong/kong-gateway:latest /bin/bash -c "kong version"
Kong Enterprise 3.6.1.0
Here is an illustration between CMD and ENTRYPOINT:
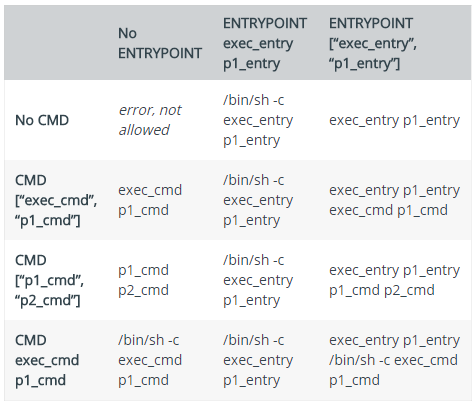
Refer to Dockerfile reference for more details.
Custom Image
Docker Commit
~ $ docker exec -it webserver bash
#
root@docker ~ # echo '<h1>Hello, Docker!</h1>' > /usr/share/nginx/html/index.html
root@docker ~ # exit
#
~ $ docker diff webserver
~ $ docker container commit -a 'jim' -m 'change front page' webserver nginx:v2
~ $ docker image ls nginx
~ $ docker history nginx:v2
- We modified container layer storage. Use diff to check details.
- Visit the Nginx container page again.
-
commit records modification as a new layer and create a new image.
Avoid commit command as miscellaneous operations (garbage) are recorded either. As discussed in "Data Share" section, we can make use of Volume, Bind Mount, or tmpfs, or resort to 'Build Image by Dockerfile' section below.
-
To verify the new image:
~ $ docker run --name web2 -d -p 8081:80 --rm nginx:v2The
--rmtells to remove the container upon exit. -
We can inspect the target image, and will find "ContainerConfig" and "Config". They are almost identical.
"ContainerConfig" is the config of current container from within this image is committed, while the "Config" is the exact configuration of the image. Pay attention to the Cmd parts. If we build by Dockerfile, then they looks different. The ContainerConfig this is the temporary container spawned to create the image. Check what-is-different-of-config-and-containerconfig-of-docker-inspect.
Docker Build Dockerfile
From commit example above, we can create new image layer but many negligible commands like ls, pwd, etc. are recourded as well.
Similar to Makefile, Docker uses Dockerfile to define image with specified instructions like FROM, COPY, RUN etc. Each instruction creates a new intermediate layer and a new intermediate image. In order to minimize number of layers and images, we'd better merge instructions as much as possible.
In this section, we use Dockerfile to create image nginx:v2.
~ $ mkdir mynginx
~ $ cd mynginx
~ $ vim Dockerfile
#
FROM nginx
RUN echo '<h1>Hello, Docker!</h1>' > /usr/share/nginx/html/index.html
Just two lines! FROM imports the base image on which we will create the new layer. If we do not want any base image, use the special null image scratch.
Now we build the image. Please refer to Docker Build Overview to check the difference between docker buildx and docker build. To put it simple, docker build is wrapper of docker buildx with default arguments.
~ $ BUILDKIT_PROGRESS=plain docker buildx build --no-cache --load -t nginx:v3 -t nginx -f Dockerfile .
#
Sending build context to Docker daemon  2.048kB
Step 1/2 : FROM nginx
 ---> b175e7467d66
Step 2/2 : RUN echo '<h1>Hello, Docker!</h1>' > /usr/share/nginx/html/index.html
 ---> Running in d5baea5c6341
Removing intermediate container d5baea5c6341
 ---> 18cc3a3480f0
Successfully built 18cc3a3480f0
Successfully tagged nginx:v3
-
The
-toption of docker build actually refers to name of the target image. We can leave the tag part to use the default latest. We can also supply multiple tags. From example above, the second tag is the default latest.If we specify a name that exists already, we detach that name from an existing image and associate it with the new image. The old image still exist and can be checked the "RepoTags" field of
docker inspect <image-id>. -
During the building process, both an intermediate container (d5baea5c6341) and image (18cc3a3480f0) is created for 'RUN' instruction.
The intermediate container defines a new layer which is then committed to create a new image. Afterwards, the intermediate container is removed, but the intermediate image is kept.
-
The trailing dot means the current directory is the building context directory. It is also the default location of the Dockerfile. Sometimes, we exclude some context files from the durectory by the .dockerignore file, as below:
~ $ echo ".git" >> .dockerignoreDocker sends all files within context directory to remote Docker engine (daemon). Image can be built without a context directory if we don't have any supplementary files.
~ $ docker build -t nginx:v3 - < /path/to/DockerfileThe hypen character cannot be omitted!
- If there exist multiple CMD/ENTRYPOINT instructions from different layers, only that of the topmost layer will be executed upon container start. All the rest CMD/ENTRYPOINT are overriden.
-
After the building, we can run nginx:v3 image:
~ $ docker run --name web3 -d -p 8081:80 --rm nginx:v3 - Apart from builing a new docker image for the web server, we can utilize 'Data Share' to attach a Volume or Bind Mount to the base docker image. Build the web server within the attached storage instead.
- Sometimes, we may want to remove the cache of build, which can be accomplished by docker builder prune -a.
-
Here is another Dockerfile instance:
FROM centos:latest RUN [/bin/bash, -c, 'groupadd -g 1000 username ; useradd -ms /bin/bash -u 1000 -g 1000 username; echo "username:1C2B3A" | chpasswd'] CMD ["/bin/bash"]- Recall that in section 'Run an Image',
-u username:groupnamerequires that the username and groupname exist when creating the image. Change the account password immedately after the container is created as the initial password is explicitly written in the Dockerfile. -
By default, the 'RUN' instruction uses /bin/sh form. It is replaced by /bin/bash in this example.
Also, multiple relevant shell commands are merged into one single 'RUN' instruction. We can also the split the command by line continuation like:
RUN /bin/bash -c 'useradd -ms /bin/bash -u 1000 -g 1000 username ; \
echo "username:1C2B3A" | chpasswd'
- Recall that in section 'Run an Image',
- Some commands may have ask interactive questions. Please check DEBIAN_FRONTEND=noninteractive.
- See multi-platform build.
Refer to Best practice for writing Dockerfile.
Share Images
We can share our own docker image to a registry (e.g. docker.io) by docker push.
Suppose we have a nginx image got from Docker hub, and want to re-push it to Docker Hub under a personal account.
Pull official image. If we do not specify a tag, the latest image is pulled.
~ $ docker pull nginx
Using default tag: latest
...
Login to the personal account.
~ $ docker login -u myaccount
Push to my personal account. If we do not specify a tag, the image is tagged to latest.
~ $ docker tag <nginx|sha256> myaccount/nginx

~ $ docker push myaccount/nginx
Using default tag: latest
...
If we want to use a different registry rather than the default docker.io, then add the registry to the new tag as well as follows.
~ $ docker tag <nginx|sha256> myregistry.com:5000/myaccount/nginx

~ $ docker push myregistry.com:5000/myaccount/nginx
We can assign mutiple tages to the image.
~ $ docker tag <nginx|sha256> myaccount/nginx:2.0.0
~ $ docker push myaccount/nginx:2.0.0

~ $ docker tag <nginx|sha256> myaccount/nginx:2.0
~ $ docker push myaccount/nginx:2.0

~ $ docker tag <nginx|sha256> myaccount/nginx:2
~ $ docker push myaccount/nginx:2
We can re-assign the latest tag to a new version.
~ $ docker tag myaccount/nginx:2.1.0 myaccount/nginx:latest
~ $ docker push myaccount/nginx:latest
If the imange is multi-platform (e.g. AMD64 and ARM64) capable, we have to repeat the pull, tag and push for each platform via option --platform. The more advanced tool regctl takes care of all platforms with just one command. Please read 1, 2 and 3.
~ $ regctl registry login
~ $ regctl registry config

~ $ regctl image manifest kong/kong-gateway:latest
~ $ regctl image inspect kong/kong-gateway:latest

~ $ regctl image manifest kong/kong-gateway:3.4.1.0

# pull, tag and push
~ $ regctl image copy kong/kong-gateway:3.4.1.0 kong/kong-gateway:latest
~ $ regctl image copy kong/kong-gateway:3.4.1.0-ubuntu kong/kong-gateway:latest-ubuntu
Apart from pushing to a registry, we can just share the image bundle.
~ $ docker images 'kong-wp'

~ $ docker image save -o kong-wp-3501.tar kong-wp:3.5.0.1

# for file transmission
~ $ tar -cJvf kong-wp-3501.tar.xz kong-wp-3501.tar
~ $ tar -xJvf kong-wp-3501.tar.xz

~ $ docker image load -i kong-wp-3501.tar
Pay attention that image bundle is different from the OCI container bundle. See What is the difference between save and export in Docker?.
Docker Compose
The compose project name by default is named after PWD. The name of containers share the same prefix (i.e. name of the project).
We can share compose configurations between files and/or projects by including other compose files or extending a service from from another service of another compose file. Check "biji/archive/kong-dev-compose.yaml".
When bind-mount a file, pay attention to provide the absolute path. Check data share.
In Docker Compose file, we can also use buildx to build an image from Dockerfile. Alternatively, we can also run multiple commands.
Troubleshooting
We can attach an ephemeral container to an existing container for troubleshooting purpose. The ephemeral container would share the target container's Linux namespaces.
For example, to debug network issues, we can make use of netshoot. The netshoot container has a world of built-in network troubleshooting tools like nmap, tcpdump, etc. We just need to attach the netshoot container to the target container's network namespace.
~ $ docker run --name netshoot \
--rm \
--network container:<target-name|target-ID> \
--mount type=bind,src=./data/,dst=/data \
-itd nicolaka/netshoot

~ $ docker exec -it netshoot zsh

# capture packets of target container
~ # tcpdump -i eth0 port 6379 -w /data/redis.pcap
For simple Linux utilities, we just busybox.
~ $ docker run --name test \
--rm \
--net=container:opentelemetry-otel-collector-1 --pid=container:opentelemetry-otel-collector-1 \
-it busybox:1.36

/ # ps aux
PID   USER     TIME  COMMAND
    1 10001     1:12 /otelcol-contrib --config /etc/otelcol-contrib/config.yaml
  212 root      0:00 sh
  218 root      0:00 ps aux